Lesson 2 : Add and Edit command
In lesson 2 we will look at a number of new commands particularly the Add and Edit pipe commands
File ->Save As command
We will use TEST1.FHC project file as our base file and add some additional pipes later on we will look at how we start a new project from new. As we are using the TEST1.FHC project file from the examples folder we probably don't want to overwrite it so should use the menu File -> Save As command and you will be prompted to give the project a new name we will give it the name LESSON2.FHC
Tools -> Show Path command
If you use the save as menu command you may have noticed that FHC has opened the save as dialogue box and is asking you to save it in the same folder as you opened TEST1.FHC, this is standard behaviour for FHC will normally remember the last project folder which you are using. Once you saved the project with a new name you will see that it appears in the top left-hand corner on the window bar, this always told you which your current project is.
It is sometimes useful to also know its location and you can find this out by using menu Tools -> Show Path command. If you try this you will see that you also get a dialogue which tells you the current path to the project file, if you press the Yes button FHC will open the Windows Explorer where the project is located but you probably need to get your task bar to bring forward the Windows Explorer window.
Tools -> Auto Node
Every pipe in FHC has a unique reference number which we call the Node Number. We have two options in FHC, we can provide our own numbers each time we add a new pipe or FHC can automatically allocate a number for us, this is called Auto Node. We would recommend that when you're beginning to use FHC that you use the auto node facility.
Before we start to add any new pipes let's ensure that we have the auto node switched 'On' to check this we use the menu Tools -> Auto Node command if it is switched on then you will see a tick to the left, this command toggles On/Off each time you select it, we will ensure that is on and that you can see the tick.
It's useful to have a gap between node numbers so if later in the project we need to add additional pipe we can just use the break command and provide our own know number which is in a similar sequence. The next command allows you to control the number of steps between each node number so if we had a node number 250 and the step increment was set at 5 then the next automatic node number would be 255. This exercise we will set the auto node numbering increment to 10, to do this go to menu Tools -> Node Increment command and select 10.
Add New Pipe
Before we add our first pipe let's make things simple and return the drawing to a plan view to do this press the shortcut key [F2]. It would also be useful to be able to see the node numbers as we can then see how the auto numbering works. To do this use the right hand mouse button to open the context menu and then select Node Numbers.
To add a new pipe we will use menu Draw -> Add Pipe command or you can use the shortcut key [Ctrl+A]. Once you have selected the command you need to use the mouse pointer to select the pipe you wish to add the pipe do this to node number 133 you should now see the adding a pipe dialogue box and the next know number will have been automatically selected.

Hopefully you can now see a dialogue box similar to the one above and you can see that we put some numbers against some of the key features
.
1.Pipe type is a drop-down box which in the use to select the type of pipe material you are using
2.Once you selected the pipe material you can then select the pipe size
3.You will need to enter in the length of pipe in metres
4.When you drawing in FHC the pipes orientated in accordance with points of the compass you can use the quick entry system which consists a set of buttons or the drop-down box.
You may have also noticed at all the text boxes are populated except pipe length (3), FHC always assumes that the next pipe will have the same characteristics as the last pipe unless you make a change using this dialogue box this makes data entry extremely quick. For a first pipe which is going to add length of 3.0m and you should add this into (3) and then press the Apply button. FHC will now have added a new pipe 3.0 m long and you may have also noticed that it has a head at the end this is because the pipe you are adding to also had a head.

We now going to look at 2 more commands No (4) & (5) and see how these can help us.
5.This command is called lock length and is extremely useful if you are entering a lot of data with the same pipe length. To use this command enter the pipe length into the horizontal pipe length text box (3) and then press the LL button which will change to LL-ON.
6.The RH command will remove the head at the end of the pipe. This is useful as we are adding a new pipe to pipe which has a head so the new pipe also have a head unless it is removed this button symbol and quick to use to remove the head.
The next pipe which we going to add is going to be 2 m long so you need to enter this into the horizontal pipe length text box (3) and press the apply button.

We will add one more pipe in this lesson but this time will change its direction to West to do this we will press W direction button and this will update our highlighted drop-down box. Ensure that you have a pipe length entered in the horizontal pipe length text box (3) and press the apply button.
There is a course a lot more options which you can use with the add pipe command but the above should show you how simple it is to add a new pipe change pipe material, pipe size, direction and length. We have also looked at how to remove the head with the RH command and how the LL command can simplify data entry when all the pipe lengths for the same.
Once you have selected the command in FHC such as ADD Pipe then this command can be used repeatedly you do not need to keep selecting it each time you add a pipe. If you look in the status bar it will tell you which command is currently active.
Edit Pipe
We have seen how we can add pipes to the FHC project and now we will look at how you can change attributes with pipes you have already drawn, to do this we use the edit command. We first need to select the command which is located in the Edit -> Pipe edit or the shortcut key [Ctrl+E], once you've selected it now select a pipe in the system and the edit pipe box will appear and you can now make changes to the pipe as you require.
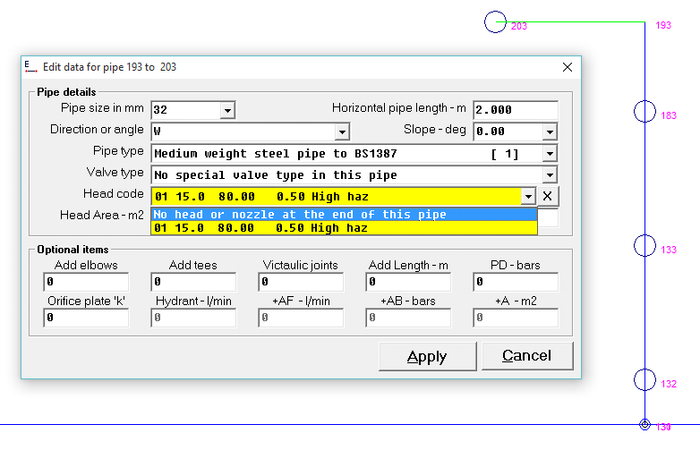
It will provide you with a little example you can get started with. If you select the edit command and then Node numbers 193-203 the edit dialogue box will open now to a head code by using the head code drop-down box and press apply. We are now added ahead to system. Once she started an edit command you can double-click on any of the pipes in the system to open the edit dialogue box.
Related Topics
Video tutorial
You can now watch a short video which demonstrates all the different techniques which we spoke about above you may wish to watch the video first but we would always recommend that you try out each techniques before carrying on to the next lesson.
Watch the Video in HD Lesson 2 Video
|
FHC - Reference & Tutorial | Version 2.4 |
Copyright © 2015-2025 Canute LLP | www.canutesoft.com |